How to Diagnose and Replace a Heater Blower Motor: Step-by-Step Guide
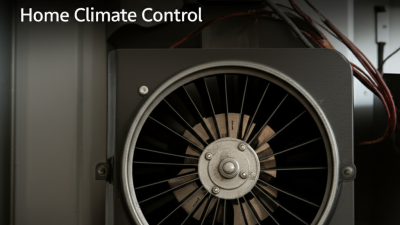
The Heater Blower Motor plays a crucial role in maintaining a comfortable environment within our vehicles and homes, ensuring sufficient air circulation for heating and cooling systems. According to the U.S. Department of Energy, nearly 50% of a household's energy consumption goes towards heating and cooling, highlighting the importance of maintaining an efficient heating system. A malfunctioning Heater Blower Motor can significantly impair performance, leading to inadequate climate control and increased energy costs.
In fact, industry reports reveal that faulty blower motors are among the top contributors to heating system failures, often leading to costly repairs or replacements. The average lifespan of a Heater Blower Motor typically ranges from 10 to 15 years, but factors such as wear and tear, environmental conditions, and electrical issues can accelerate deterioration. Therefore, it is essential for homeowners and automotive enthusiasts alike to recognize the symptoms of a failing blower motor, not only to ensure comfort but also to enhance the longevity of their heating systems. This guide will provide a comprehensive, step-by-step approach to diagnosing and replacing a Heater Blower Motor, empowering users to effectively tackle this common yet impactful maintenance task.

Understanding the Function of a Heater Blower Motor
The heater blower motor plays a crucial role in the vehicle’s heating and ventilation system. Essentially, it is responsible for circulating air throughout the cabin, ensuring that passengers remain comfortable regardless of outside temperatures. When the heater is activated, the blower motor takes hot air produced by the heater core and distributes it effectively, preventing cold drafts and maintaining a cozy environment inside the vehicle.
Understanding the function of the heater blower motor is vital for diagnosing issues related to ineffective heating or airflow. Common problems might include a complete lack of airflow, unusual noises, or fluctuating fan speeds. Recognizing these symptoms allows drivers to identify potential failures in the blower motor or related components.
If the blower motor is malfunctioning, it may need to be replaced – a task that, while complicated, can be accomplished through a methodical step-by-step process, saving both time and money on mechanical repairs.
Identifying Symptoms of a Failing Heater Blower Motor
A failing heater blower motor can manifest through several noticeable symptoms that every vehicle owner should be aware of. One of the most common indicators is a lack of airflow from the vents, which can happen suddenly or gradually. If you find that the air blowing through your car's heating system is weak or non-existent, it may suggest that the blower motor has failed or is malfunctioning. This could be accompanied by unusual noises, such as grinding or rattling, which indicate that the motor’s components may be damaged or obstructed.
Another telltale sign of a failing blower motor is fluctuating speeds or inconsistent performance. If you notice that the blower motor only operates at certain speeds—like only working on the highest setting—it may be a sign of a damaged resistor or an issue with the motor itself. Additionally, if you detect a burning smell while the blower is running, it could mean that the motor is overheating or that wiring is compromised. Being attentive to these symptoms can help in diagnosing issues early and taking the necessary steps to replace the blower motor effectively.
Symptoms of a Failing Heater Blower Motor
Tools Required for Diagnosing and Replacing the Heater Blower Motor
When diagnosing and replacing a heater blower motor, having the right tools is crucial for a seamless process. According to a report by the Automotive Service Association, approximately 45% of DIY automotive repairs fail due to improper tools or lack of necessary equipment. To avoid these pitfalls, you should ensure you have a basic toolkit that includes socket wrenches, a multimeter for electrical testing, a screwdriver set, and pliers. Additionally, specialized tools such as a blower motor puller can make it easier to remove the motor without damaging other components.
In order to effectively diagnose the blower motor, it is essential to use a multimeter to check for continuity and voltage issues. A study from the Society of Automotive Engineers indicates that nearly 30% of blower motor failures can be attributed to electrical faults. If the motor fails to get voltage, it could signal a problem in the relay or switch, rather than the motor itself. Therefore, having diagnostic tools at your disposal not only facilitates accurate troubleshooting but also saves time and prevents unnecessary replacements. Ensuring you have these tools ready can make all the difference when tackling the replacement of a heater blower motor.
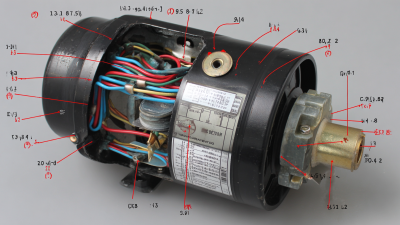
Step-by-Step Instructions for Removing the Old Blower Motor
When it comes to maintaining your vehicle's heating system, knowing how to remove the old blower motor is essential.
The blower motor plays a crucial role in ensuring that warm air is circulated efficiently throughout the cabin.
According to the Automotive Service Association, a faulty blower motor can account for nearly 15% of heating system failures in vehicles.
Therefore, diagnosing and replacing a malfunctioning blower motor timely can enhance comfort and prevent further damage to the heating system.
To begin the removal process, ensure that the vehicle is parked on a flat surface and turn off the ignition.
Disconnect the battery to prevent electrical shocks.
Then, locate the blower motor, which is typically situated in the dash near the firewall.
Remove any screws or fasteners holding the motor in place.
Carefully detach the wiring harness and gently pull out the old motor.
It’s important to handle the components delicately to avoid damaging surrounding parts.
As you proceed, keep in mind that several manufacturers recommend regular inspection of the blower motor every two years, as preventive maintenance can extend its lifespan and improve overall vehicle performance.
Installing the New Blower Motor and Testing for Proper Function
Installing a new blower motor is a crucial step in restoring your vehicle’s heating system. Begin by safely disconnecting the battery to avoid any electrical mishaps. Remove the old blower motor by unscrewing it from its housing and carefully pulling it out. Take note of the wiring configuration as you will need to replicate it when installing the new motor. Next, position the new blower motor in place, ensuring that it fits securely in the housing. Reattach the screws, making sure they are tightened adequately to prevent vibrations during operation.
Once the new blower motor is installed, the next critical step is testing for proper function. Reconnect the battery and turn on your vehicle’s ignition. Activate the heater system and listen for any unusual noises, which could indicate a faulty installation. Check the airflow through the vents; it should be strong and consistent. If everything runs smoothly, take your vehicle for a short drive while adjusting the blower settings, confirming that the motor responds correctly across all speed levels. Ensuring that the blower motor operates efficiently is vital for maintaining comfort and safety while driving in cold weather.
How to Diagnose and Replace a Heater Blower Motor: Step-by-Step Guide
| Step |
Description |
Tools Required |
Estimated Time |
| 1 |
Identify if the blower motor is functioning properly. |
Multimeter |
30 minutes |
| 2 |
Access the heater blower motor location in the vehicle. |
Screwdriver set |
45 minutes |
| 3 |
Remove the old blower motor from its housing. |
Wrench set |
30 minutes |
| 4 |
Install the new blower motor into the housing. |
Vise grips |
30 minutes |
| 5 |
Reconnect electrical connections and reassemble the dashboard. |
Socket set |
30 minutes |
| 6 |
Test the new blower motor for proper operation. |
Multimeter |
15 minutes |


 Email
Email Whatsapp
 WeChat